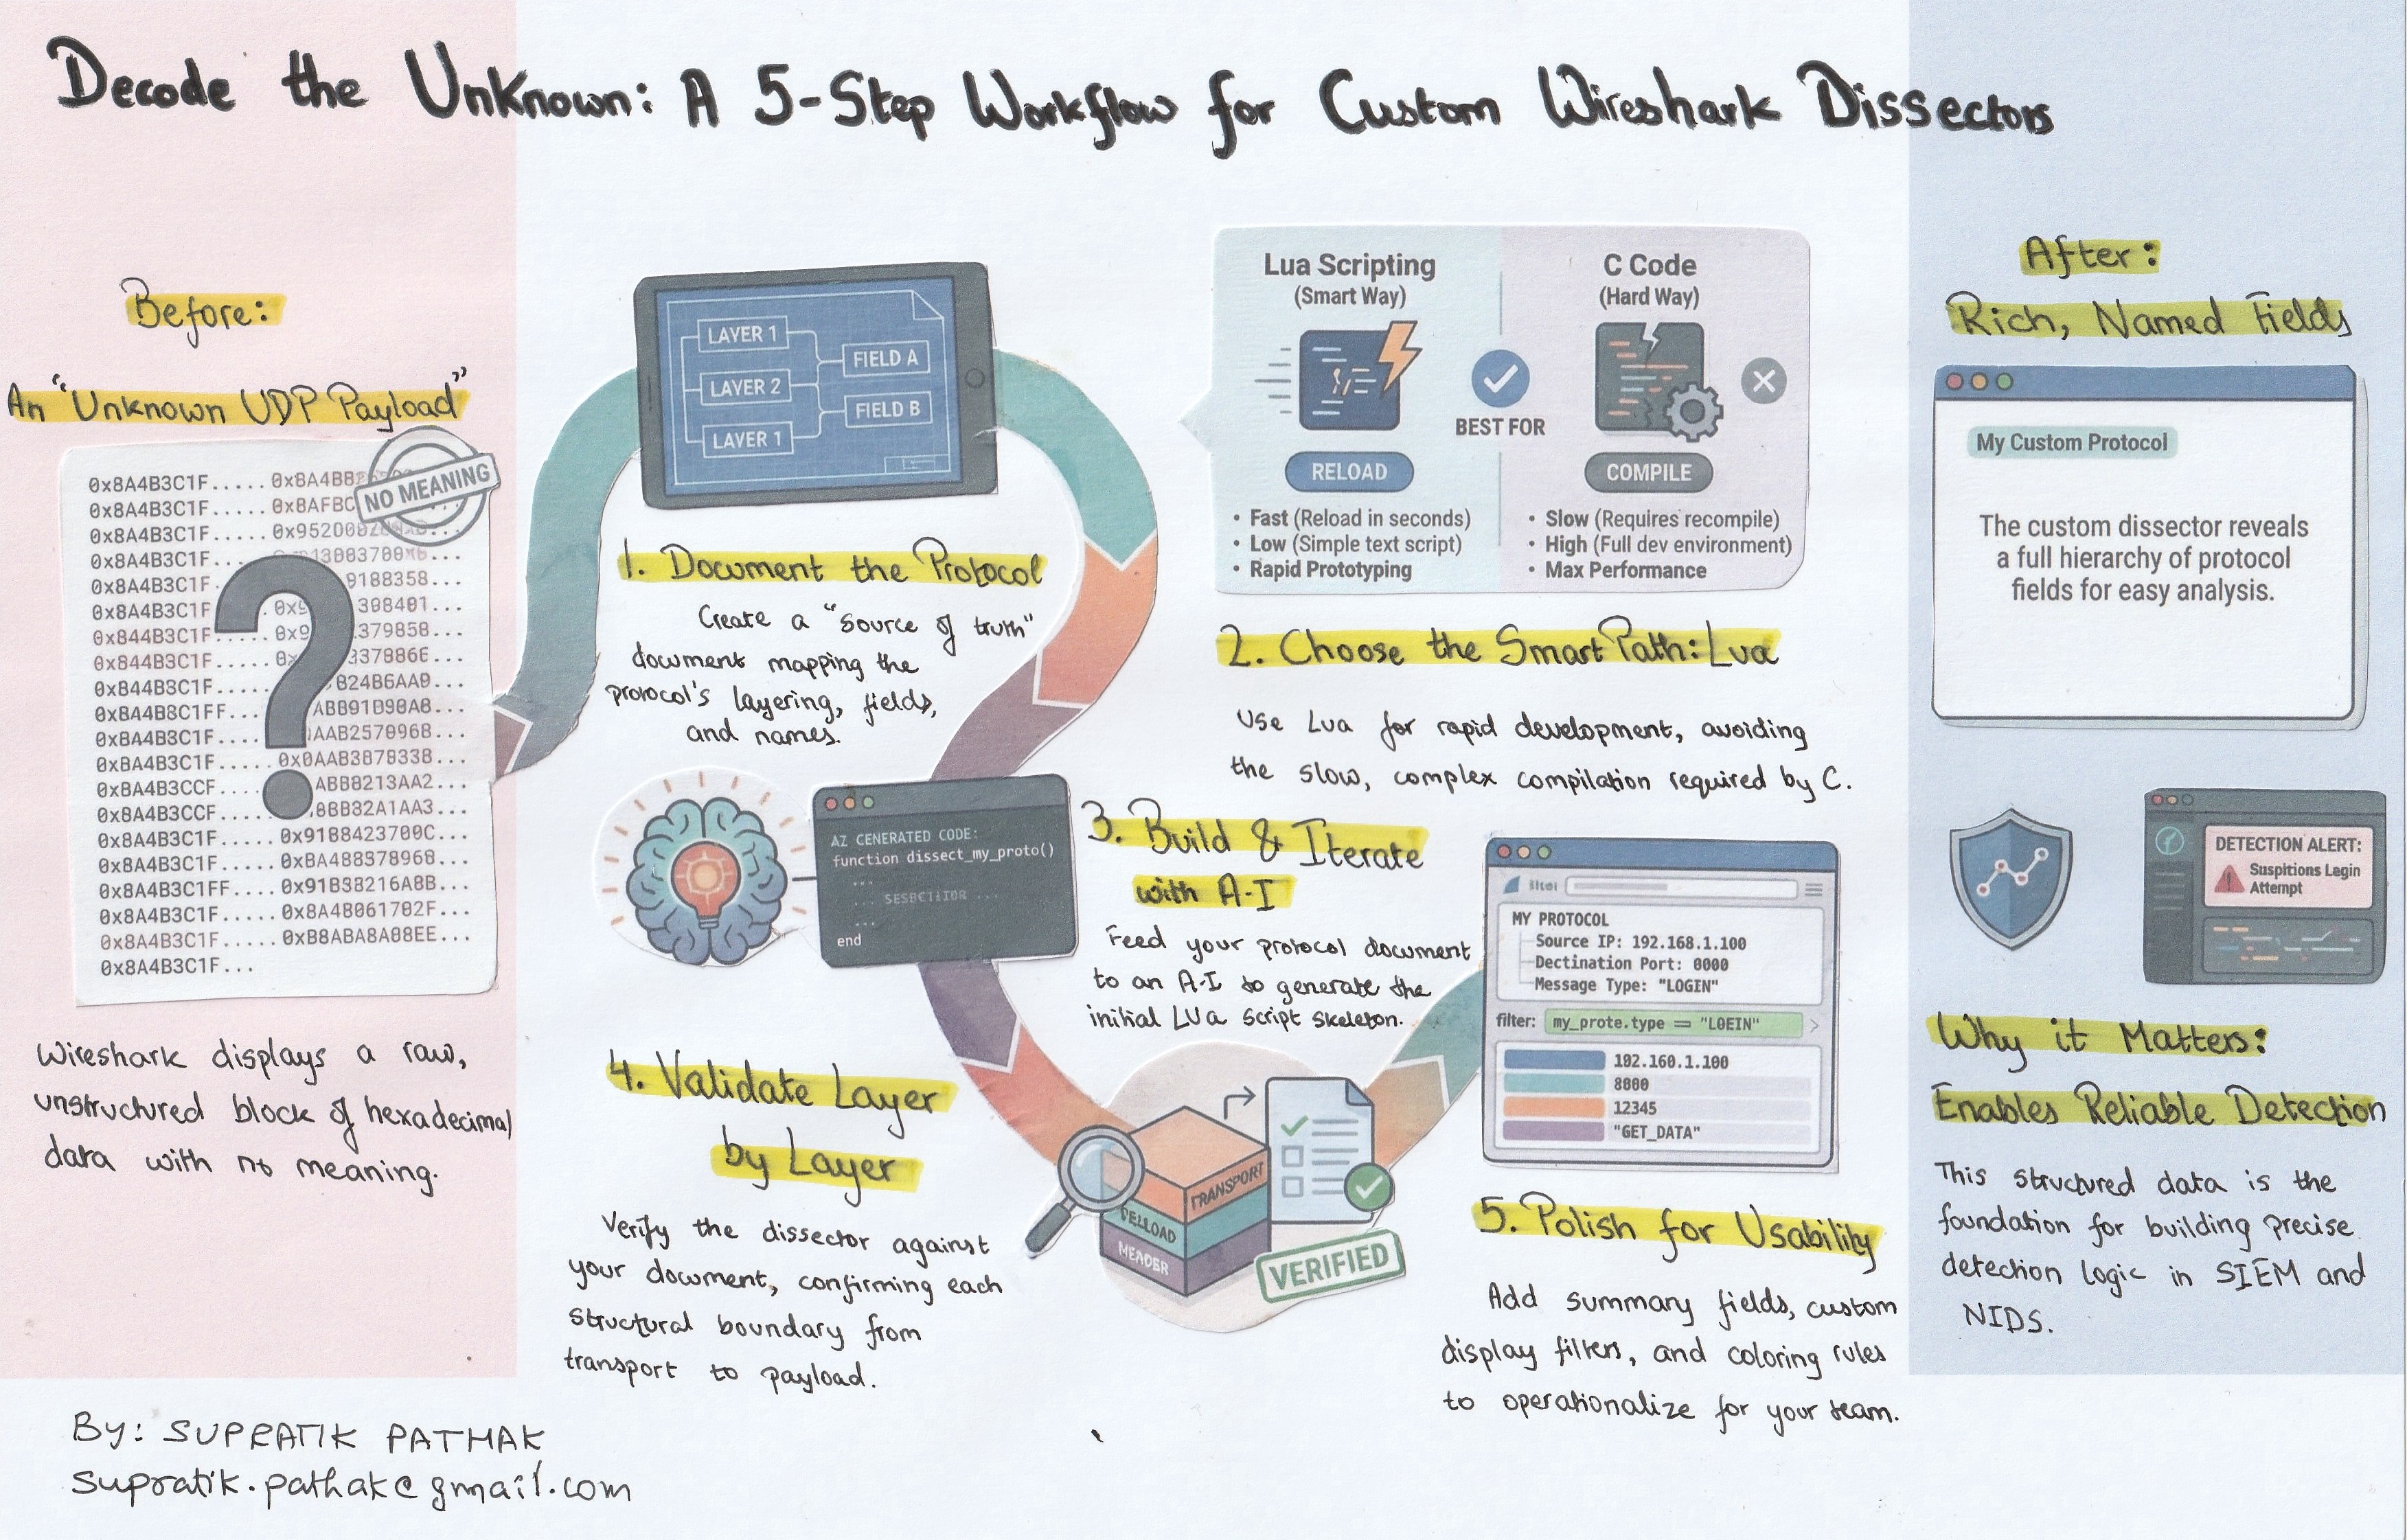
How to Decode “Unknown” Protocols in Wireshark (R-GOOSE as the Worked Example)
Why this blog (and why it matters)
Wireshark is phenomenal—but your job doesn’t end where its built-in protocol list does. I’ve long been intrigued by how Wireshark turns raw bytes into a clean, hierarchical packet view. Understanding that mechanism—fields, lengths, tags, and how a dissector maps bytes to meaning—pays off far beyond packet analysis. It’s the same foundation you need to develop reliable detection logic in SIEM and NIDS: translate protocol semantics into precise match conditions, field extractions, and anomaly rules, instead of relying solely on signatures.
This guide presents a repeatable method to go from unknown bytes to a working decode. I use IEC 61850-90-5 R-GOOSE over UDP as the example (the Wireshark version I started with didn’t dissect R-GOOSE), but the process applies to any unsupported or proprietary protocol.
By the end, you’ll know how to analyze a protocol, build a working Lua dissector for fast iteration, and demonstrate tangible value with a before/after Wireshark view that analysts—and detection engineers—can operationalize.
Bookmark this. It’s the workflow I rely on whenever Wireshark shows me a hex blob and a shrug.
What we’ll build
- A detailed document that provides methods to decode the protocol structure
- A working Lua dissector for IEC 61850-90-5 (R-GOOSE over UDP)
- A before/after demo: Wireshark showing “unknown UDP payload” → rich, named fields.
Prerequisites
- Wireshark 4.x (I used 4.2.2)
- A pcap with your target protocol (for me: R-GOOSE over UDP/102)
- Your protocol notes/spec (I ingest a Word doc I created: R-GOOSE Protocol.docx)
- Basic Lua (for rapid prototyping)
A word about Lua
In the context of Wireshark, Lua is a lightweight, embedded scripting language that acts as a bridge between you and Wireshark’s powerful internal engine. While Wireshark is built in C for raw performance, it includes a Lua interpreter that allows users to write plugins (like dissectors and taps) in simple text files. Think of it as a “shortcut” to the packet processing core: instead of setting up a complex C compiler environment and rebuilding the entire software to add a new protocol, you simply write a few lines of Lua script, and Wireshark executes it on the fly. It is the industry standard for rapid prototyping and dissecting custom or proprietary protocols.
References for Further Reading
Wireshark Developer’s Guide (Lua Support): The official manual documentation for the Wireshark Lua API.
Wireshark Wiki – Lua: A community-maintained hub with examples, tutorials, and common pitfalls.
Lua.org: The official home of the language, explaining its design philosophy as a lightweight scripting tool.
The Method
Step 1: Build a single source of truth
The first and arguably most critical step is to solidify your understanding of the protocol by creating a simple and concise Protocol Definition Document. This document serves as the absolute source of truth for all subsequent decoding efforts and is the same foundation required to develop precise match conditions and field extractions for detection logic in SIEM and NIDS platforms.
This document maps the protocol structure top-down, detailing every element that turns raw bytes into meaning. Key components include:
- Layering: Precisely defining where the protocol sits within the stack (e.g., UDP → shim → session → payload → APDU).
- Field Mapping: Specifying the exact field order, associated tags, explicit lengths, and specific encodings used (such as TLV, BER, fixed-width, or bit-fields).
- Annotation: Including at least one detailed annotated hex example complete with offsets.
- Naming: Defining the exact, analyst-friendly field names you intend to see displayed within Wireshark.
A robust protocol definition document is paramount: if the document is accurate, the resulting dissector will be accurate. Furthermore, by detailing the structure clearly now, you ensure the AI tool generates high-quality code instantly when you “ingest” this file in Step 4.
I am giving away the document that I have prepared, you can find it here – Decoding IEC 61850-90-5 (R-GOOSE) Packets – A Practical Guide.pdf
Step 2: Choosing the Approach (The Hard Way vs. The Smart Way)
With the protocol structure fully mapped, Step 2 involves selecting the most efficient method for building the dissector. In the Wireshark ecosystem, there are two primary paths:
- Path 1: C Code (The Hard Way)
- C is the application’s native language and is considered the “official” way to write dissectors for performance. However, this approach demands writing extensive code, setting up a complex development environment, and requires recompiling—or rebuilding—the entire Wireshark application whenever even a minor change is necessary.
- For custom or proprietary protocols, this path is often slow, frustrating, and represents significant overkill.
- Path 2: Lua Scripting (The Smart Way)
- This is the optimized shortcut for rapid development. Instead of requiring complex compilers or rebuilding the entire application, you simply write your dissector in a plain text script,. Wireshark executes this script on the fly.
- This approach allows developers to move quickly, test changes instantly, and is perfectly suited for letting AI generate the initial files.
Step 3 — Set up your environment for iteration
This step is dedicated to establishing an environment that facilitates rapid iteration and testing. The goal is to set up a configuration that allows you to make a change to the Lua script and observe its effect in Wireshark immediately.
To achieve this, you must locate your Wireshark personal plugin directory, which varies based on your operating system:
- Windows: %APPDATA%\Wireshark\plugins\
- macOS: ~/Library/Application Support/Wireshark/Plugins/
- Linux: ~/.local/lib/wireshark/plugins/ (or ~/.config/wireshark/plugins/)
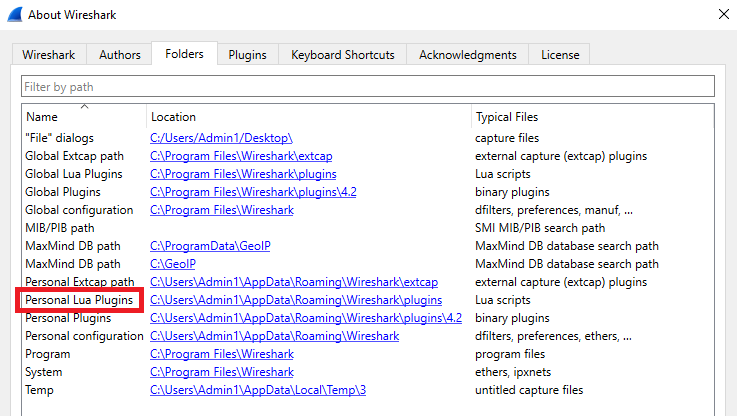
Create your Lua file (e.g., iec90_5_goose.lua) within this directory. After making any modifications to the script, you only need to navigate to Analyze → Reload Lua Plugins within Wireshark to apply the changes.
Additionally, keeping a tiny test pcap file containing only one or two packets of your target protocol will ensure that subsequent iterations are extremely fast.
Step 4 — Build a minimal Lua dissector
Step 4 focuses on generating the core code for your dissector, beginning with a minimal skeleton. This initial script must perform several critical functions:
- Binding: It must successfully bind to the target transport header (e.g., udp.port == 102).
- Identification: It should check for specific marker bytes (e.g., the CLTP identifier 01 40).
- Hierarchy: It must establish the top-level tree items for the protocol, such as R-GOOSE, Session Header, and Payload.
While you could incrementally decode each sub-field manually, leveraging modern generative AI tools drastically accelerates this process. Since we have the detailed “Protocol Details Word File” from Step 1, you can feed that precise specification into an AI tool like ChatGPT or Gemini and instruct it to generate the Lua code. This process shifts the focus from being a Lua expert to being an effective prompt engineer.
For the highest success rate, avoid vague requests and use a structured prompt:
- Role: Define the AI as a network and Lua expert.
- Context: Explain the environment (e.g., working with R-GOOSE over UDP).
- Input Data: Paste the exact technical specifications from your definition document.
- Constraint: Ask specifically for a Wireshark Lua Plugin.
Pro Tip: It is important to acknowledge that obtaining a perfectly working script often takes multiple iterations; you must continuously refine your inputs to guide the AI until the generated code functions correctly within Wireshark.
Try this Prompt:
“Act as a Wireshark and Lua expert. I need a Lua dissector script for the R-GOOSE protocol. The protocol runs over UDP port 1024. Here are the technical specifications from my protocol design document:
$$PASTE YOUR WORD FILE CONTENT HERE $$
Please write a complete, commented rgoose.lua script that registers this protocol and adds a subtree to the packet details pane showing these fields decoded. Handle the Big-Endian byte order correctly.”
The result will be a .lua file that handles protocol registration, the dissector function, and all necessary field definitions.
Step 5 — Validate against your protocol details doc
Once the AI has generated the initial Lua script (Step 4), the process shifts from to validation against your original Protocol Definition Document. A good dissector is fundamentally a faithful translation of that document. You must walk through every field listed in your specification and verify that the generated Lua code correctly maps the bytes to their intended meaning and name within the Wireshark details pane.
Layered Validation: Proving Boundaries
To ensure accuracy, adopt a layered validation approach, carving the decode in small stages to prove each structural boundary before drilling deeper:
- Transport Header: Confirm the initial payload length received from the transport layer (e.g., UDP) is correct.
- Intermediate Shim/Wrapper: Verify any immediate protocol layers, such as checking for the CLTP marker bytes (01 40).
- Session Wrapper: Confirm the decoding of standard headers like the Session Header (including A1, 0x80 block, SPDU values, and Version fields).
- Application PDU: Validate the core fields (e.g., Length, Type 0x81, Simulation flag, APPID, and APDU length).
You should continue this process, adding one field at a time until the entire tree structure perfectly mirrors the specification documented in Step 1. Key items to check include the extraction of visible strings like gocbRef, datSet, and goID, and ensuring complex data types, such as 8-byte time fields and BIT STRING quality flags, are handled accurately.
Step 6 — (Optional) Add friendly touches
While the dissector is now functionally complete, Step 6 is where you add essential polish to significantly improve its usability. These small, friendly touches make the dissector personalized and highly effective for teams.
Focus on enhancing the user experience (UX) and maximizing the data’s utility through Wireshark’s built-in features:
- Summary Fields: Add one-line summaries to complex structures (e.g., displaying the decoded value, like FALSE, 0000, or the full timestamp 2025-01-18 08:59:46.118) directly in the packet list pane.
- Publishable Display Filters: Define and standardize display filters that can be shared across analysis teams. These allow users to quickly find specific data points without hunting through the packet details. Examples include filtering by identifiers (iec905_udp.gocbRef) or tracking sequence data (iec905_udp.stNum, iec905_udp.sqNum).
- Coloring Rules: Implement coloring rules to visually highlight important events or status changes, such as emphasizing traffic where the sequence number (stNum) changes or when a specific status flag (ndsCom == TRUE) is set.
- Heuristic Dissector (Advanced): Consider adding a heuristic dissector if the protocol is sometimes seen on ports other than its standard one (e.g., port 102). This allows Wireshark to attempt decoding based on protocol markers, even if the port number is incorrect.
Adding these elements transforms the simple decode into a powerful tool that maximizes the visibility required for deep network analysis and reliable rule development.
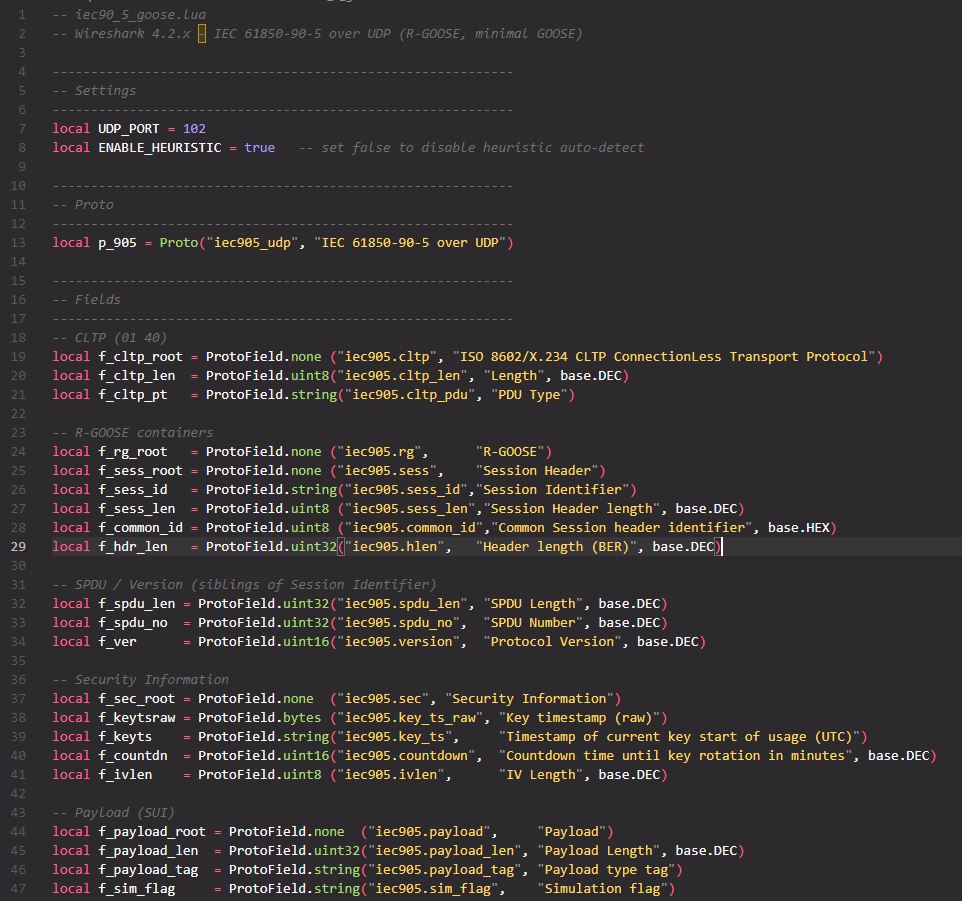
Below is a screenshot of the Lua file that I developed for my use case.
Step 5: Applying the Dissector Live
Now, let’s see the magic in action.
Before: Open your pcap. Without the dissector, UDP/102 shows a hex blob. No field names. No structure.
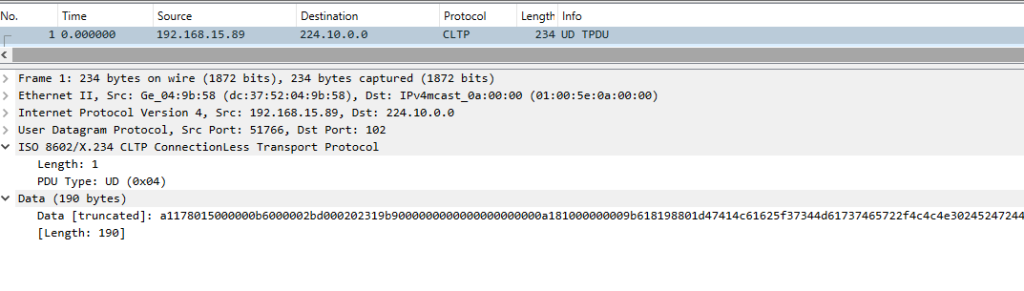
After: Drop Lua file (in my case this file was iec90_5_goose.lua) into your plugins folder and reload Lua plugins. Reopen the same packet:


When loaded correctly, we can see all the details as shown in the screenshot above:
- ISO 8602/X.234 CLTP (UD)
- R-GOOSE → Session Header (SPDU, Version)
- Security Information (key time, countdown, IV len)
- Payload (Length, Type=GOOSE 0x81, Sim flag, APPID, APDU len)
- GOOSE (gocbRef, datSet, goID, timers/counters, test, ndsCom)
- allData (N items) → structure-1, structure-2, …
- BOOLEAN
- BIT STRING (Padding: 3, bit-string: 0000)
- Per-value timestamp and TimeQuality
By combining your subject matter expertise (the Protocol Spec) with modern AI tools, you moved from a black-box hex dump to full observability in minutes, not days. This shift, from Wireshark showing an “unknown UDP payload” to providing rich, named fields, allows analysts and detection engineers to operationalize the data. Ultimately, understanding the mechanism of a dissector—how it maps fields, lengths, and tags—provides the exact foundation required to develop reliable detection logic in SIEM and NIDS.
The Repeatable Workflow: Key Takeaways
A good dissector is fundamentally a faithful translation of your protocol definition document. This workflow ensures rapid, accurate results:
- Map the Structure on Paper (Source of Truth): Establish a simple, concise Protocol Definition Document that maps the protocol top-down, detailing layering, field definitions, and desired field names.
- Make a Minimal Lua Skeleton (The Smart Way): Leverage Lua as the lightweight, embedded scripting language for rapid prototyping, avoiding the slow complexity of C code compilation.
- Layer Fields Carefully and Iterate: Set up your environment for speed and validate the decode against your specification. Use a tiny test pcap to quickly confirm each structural boundary before drilling deeper into the Application PDU.
- Add Polish for Operationalization: Incorporate friendly touches, such as custom display filters and coloring rules, to maximize the dissector’s utility for analysis teams.
- If Needed, Port to C and Ship It: While Lua is perfect for quick development, C is available if maximum performance is required for deployment.
If you want my full Lua script or a stripped “starter” version for your own proprietary protocol, ping me—I’m happy to help.
Disclaimer:
- The views expressed in this post are my own and do not necessarily reflect the views or positions of my organization.